Mixing sawdust and glue is a simple and effective way to create a durable and attractive surface for a variety of projects. Firstly, you need to gather the necessary materials, including sawdust, glue, and a stirring tool. Once the materials are ready, start by pouring the glue into a container and gradually adding the sawdust. Make sure to mix the sawdust and glue thoroughly. If necessary, add more sawdust or glue to get the desired consistency.
You can use a stirring tool to mix the sawdust and glue, or use your hands if you prefer. When done properly, the mixture should be slightly sticky to the touch and have a uniform color. Once the sawdust and glue are thoroughly combined, you can apply it to the surface you are working on. The mixture can be spread with a brush, trowel, or other tool, depending on the project. Allow the mixture to dry for a few hours before adding any additional finishes. The end result should be a strong, attractive surface that is resistant to wear and tear. With a little bit of practice, you can create beautiful surfaces with sawdust and glue.
What glue to mix with sawdust

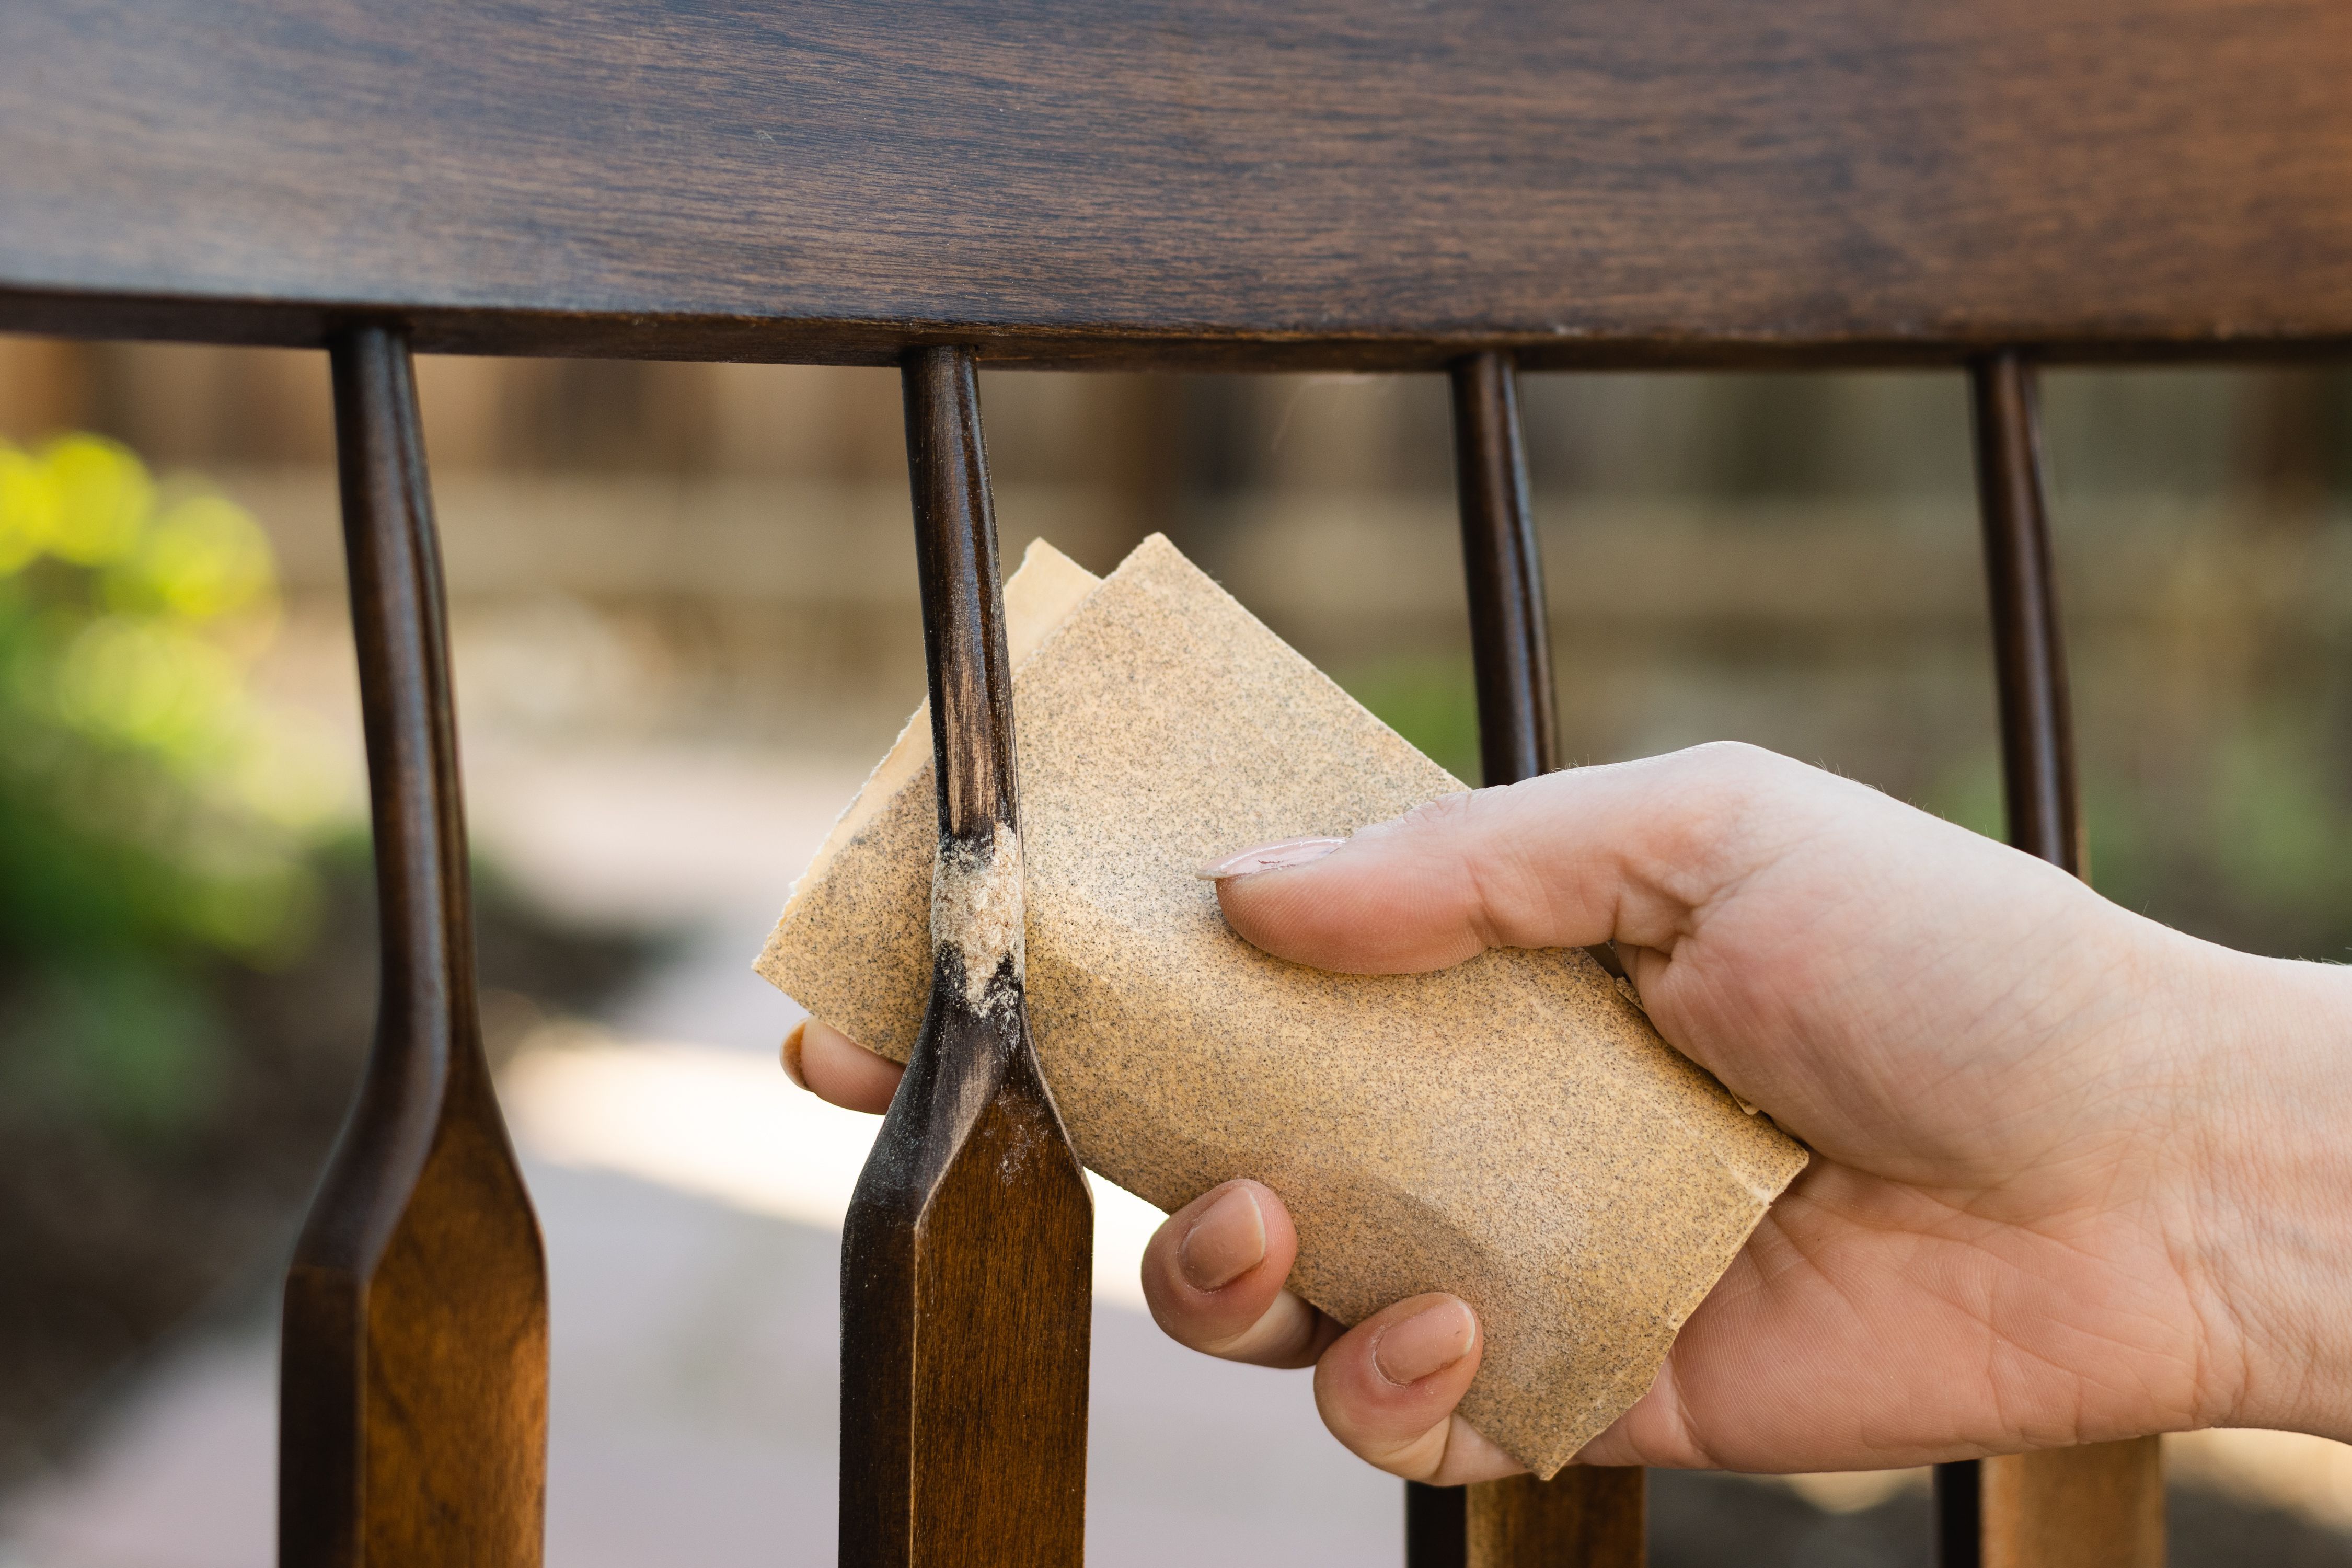
To do this, you’ll need to choose the right kind of glue. Wood glue is a popular choice as it’s easy to use and dries quickly. However, if you want a stronger bond, epoxy resin or cyanoacrylate are worth considering. When mixing sawdust and glue, you’ll need to ensure the sawdust is free from dirt and dust particles. This will ensure that the glue bonds properly with the sawdust, creating a strong and durable repair or craft.
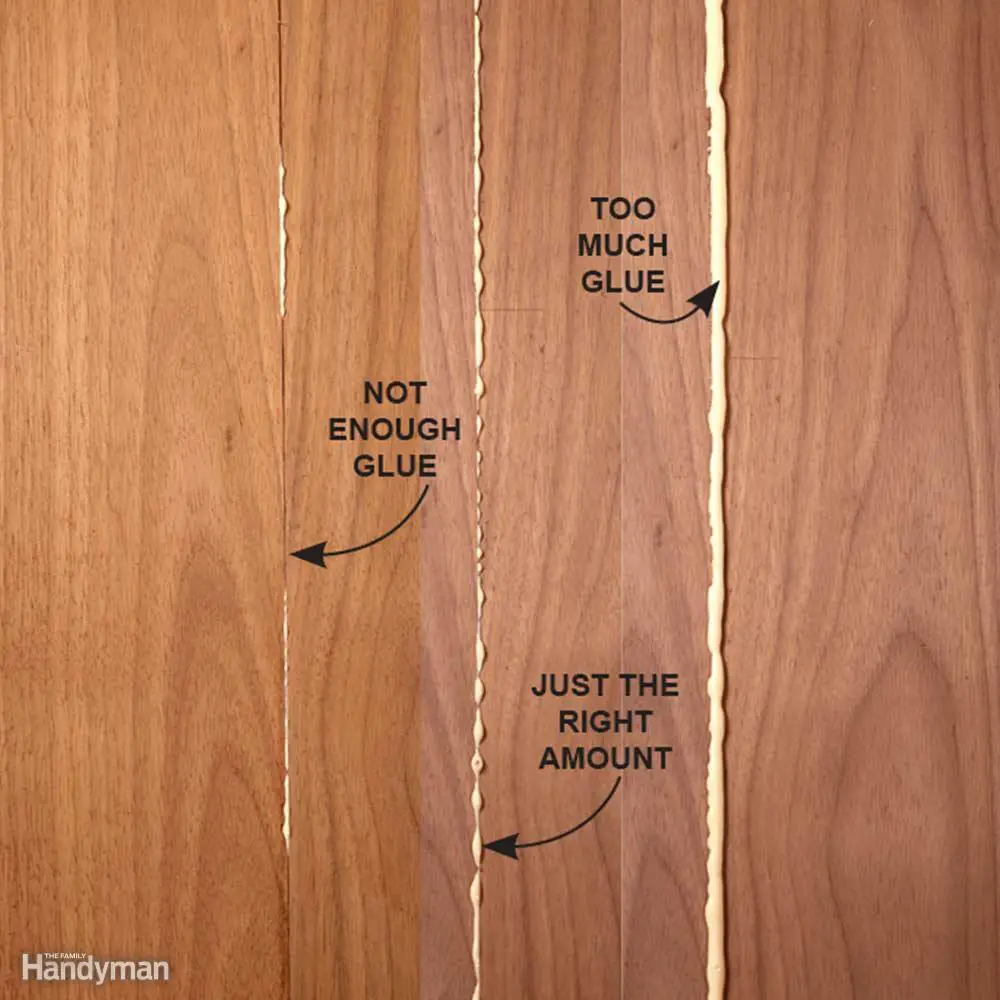
Once the sawdust is ready, mix it with the chosen glue in a container. The ratio of sawdust to glue should be roughly one part glue to four parts sawdust. Before applying the sawdust-glue mixture to your project, test the consistency on a scrap piece of wood. If it is too thick, add a small amount of water to thin it out. Conversely, if it is too thin, add sawdust. Once you are happy with the consistency, you can apply the mix to the desired area and allow to dry. With the right glue and the correct ratio of sawdust, your repair or craft should be good as new!
Can you mix sawdust with epoxy?
Mixing sawdust and epoxy can be a great way to create a strong, durable material. To start, you’ll need to choose the right sawdust for the job. Fine sawdust works best, as it offers more surface area for the glue to bond with. Make sure to use a clean dust, without any dust or debris that could interfere with the bonding process. Once you have your sawdust, mix it with the epoxy until you get a thick paste-like consistency.
Depending on how much sawdust you use, you may need to add a bit more epoxy to get the right consistency. Once you’ve finished mixing, you’ll need to apply the paste to whatever surface you’re bonding together. You can use a brush or a spackle knife to spread the mixture. Make sure to cover the entire surface, creating an even layer of sawdust and epoxy. Allow the mixture to dry for at least 24 hours before you use the material. This will allow the epoxy to fully cure and create a strong bond. Once the material has dried, you can use it for whatever purpose you need. Mixing sawdust and epoxy can be a great way to create a strong, durable material. With the right amount of sawdust, you can use this mixture to create a strong bond between two surfaces. Just make sure to allow the mixture to dry before using it, and it will be ready to use.
How do you make sawdust glue?
Firstly, you will need to gather sawdust from a table saw, band saw, or other woodworking machinery. Place the sawdust into a bowl and mix in an equal amount of white glue, such as Elmer’s glue. Stir the two ingredients together until a thick, uniform consistency is achieved. If the mixture is too thick, add a few drops of water to thin it out. When finished, spread the sawdust glue onto the desired surface with a putty knife or a brush.
Allow the glue to dry for at least an hour before handling the object. Sawdust glue is a very strong adhesive that can be used for a variety of woodworking and carpentry projects. It is especially useful for bonding wood and other materials together. To remove sawdust glue, use mineral spirits or a solvent-based glue remover. If needed, use a putty knife or a chisel to scrape off the dried glue. Sawdust glue can also be sanded off.
How to make wood filler out of sawdust and glue
First, you will need to gather your materials. This includes sawdust, glue, and a container to mix them in. Once you have all your materials, you should measure out equal parts of sawdust and glue. Pour the sawdust into the container and then add the same amount of glue. Mix the sawdust and glue together.
You can use your hands or a spoon to combine them. Keep stirring until the two ingredients are fully blended together. It is important to make sure you have mixed the sawdust and glue well. You don’t want any lumps or clumps of either ingredient in your wood filler. Once the wood filler is mixed, you can use it to fill in gaps or holes in wood. If you need to make more, just follow these steps again. With a little practice, you can easily make your own wood filler.
Can you use sawdust and glue as wood filler?
This filler can be used to fill in cracks, dents, gaps, and holes in wood surfaces. The ratio for mixing sawdust and glue is typically one part glue to three parts sawdust. For example, if you are using one cup of glue, you should mix it with three cups of sawdust. To start, you will need to gather some sawdust and your chosen glue. Sawdust can come from sanding wood, or you can buy it from a lumber supply store.
To make the best wood filler, it is important to use a sawdust that is as fine as possible. The glue can be either wood glue or white glue. Once you have the sawdust and glue, you can start mixing them together. Use a spoon, a bowl, or a small container to combine the sawdust and glue. Mix the sawdust and glue together so that they form a paste. Make sure that there are no lumps in the paste and that it is an even consistency. Once the sawdust and glue are mixed together, you can apply the wood filler to the wood surface. Make sure that you fill in any dents, cracks, gaps, or other imperfections. If necessary, you can use a putty knife or a flat piece of wood to push the wood filler into any tight spaces. Allow the filler to dry completely before sanding it down and applying a finish. By using sawdust and glue, you can create a great wood filler that can be used to fill in any dents or cracks in wood surfaces. Mix the sawdust and glue together to form a paste, and then use a putty knife or flat piece of wood to apply the wood filler to the wood surface. Allow the wood filler to dry completely before sanding it down and applying a finish.
What is a substitute for wood filler?
However, some prefer to use sawdust and glue as a substitute for wood filler. To mix sawdust and glue, start by collecting sawdust from a piece of sanded wood. Make sure that the sawdust is finely ground. Next, mix the sawdust with an adhesive, such as wood glue or epoxy. You can adjust the consistency of the mixture depending on the amount of sawdust you use.
Once the sawdust and glue are mixed together, it can be used to fill in cracks and holes. It can also be used to strengthen and create joints. To use the mixture, apply it with a putty knife or putty spatula. Once it has dried, you can sand it down to create a smooth surface. Using sawdust and glue as a wood filler substitute is an inexpensive and eco-friendly option. It is also much easier to use than wood filler – all you need to do is mix the sawdust and glue together. Plus, the sawdust and glue mixture is more durable and longer lasting than wood filler. Overall, sawdust and glue is a great substitute for wood filler. It is easy to use, cost effective, and much more durable. You can use it to repair furniture, even out uneven surfaces, and create joints. All you need to do is mix sawdust and glue together and apply with a putty knife.
Which glue is better for wood?
When mixing sawdust and glue, it is important to choose the right glue. Glues that work best for wood are PVA (polyvinyl acetate) and epoxy. PVA is great for small woodworking projects, and is easy to use and inexpensive. Epoxy is more expensive, but is more durable and water-resistant, making it ideal for projects that need to withstand a lot of wear and tear. Before you start gluing, make sure the wood is completely clean and dry.
You can use a brush to remove any dirt or dust. Gently sand down any rough areas or splinters, and use a tack cloth to remove any sawdust. Once your wood is ready, mix the sawdust and glue together with a putty knife. You can use either PVA or epoxy glue, depending on the project. For best results, mix the sawdust and glue in equal parts, and make sure the glue is completely mixed before applying it to the wood. Once you’ve applied the mixture to the wood, use a cloth or rag to spread it evenly. Allow the glue to dry thoroughly before proceeding with your project. With the right glue and careful preparation, you can easily mix sawdust and glue to create a strong bond that will last.
Is wood glue better than regular glue?
When mixing sawdust and glue, it is important to use the right type of glue. Wood glue is generally a better choice than regular glue because it is specifically designed to bond wood. Since sawdust is made of wood particles, wood glue creates a much stronger bond than regular glue. Wood glue is also easier to apply since it is a thicker consistency. It can be spread more evenly, whereas regular glue is a bit runnier, making it difficult to get an even coverage over the sawdust.
Another benefit of using wood glue is that it dries faster than regular glue. It also gives the surface a more finished look since it becomes invisible once dry. This means that no one will be able to tell that sawdust was used. With its stronger bond, easier application and quicker drying time, wood glue is definitely the better option when it comes to mixing sawdust and glue. It is important to use the correct type of glue to ensure a strong bond and professional finish.
Is wood filler and plastic wood same thing?
Wood filler and plastic wood are not the same thing. Wood filler is a type of putty used to fill in cracks, holes, and gaps in wood surfaces, while plastic wood is a mixture of sawdust and glue. To mix sawdust and glue, you will need to start by getting a container and filling it with sawdust. You can use either fine sawdust or coarse sawdust depending on the size of the wood surface you are trying to fill. Once the sawdust is in the container, mix in the glue until you get a putty-like consistency.
Once the mixture of sawdust and glue is ready, you can then apply it to the wood surface that needs filling. Using a putty knife, apply the putty to the wood surface and then use a damp cloth to smooth out any lumps or bumps. Be sure to let the putty dry completely before sanding it down. When the putty is dry, you can then sand it down for a smooth finish. If you are using wood filler, you can then stain the wood surface to match the color of the existing wood. So, in summary, wood filler and plastic wood are not the same thing and need to be used differently in order to get the desired results. Wood filler is used for filling in cracks, holes, and gaps in wood surfaces, while plastic wood is used for filling larger areas.
What is the best wood working glue?
To make sawdust and glue, you will need sawdust, glue and a mixing container. Start by pouring the glue into the mixing container and adding a few tablespoons of sawdust to it. Mix the sawdust and glue together until it forms a thick paste. Ensure that the paste is distributed evenly throughout the mixture. When applying the sawdust and glue mixture, make sure to spread it evenly and press it into the wood surface.
Allow the glue to fully dry, which usually takes up to 24 hours. Once it is dry, the woodworking glue will be ready for use. For best results, choose a high-quality woodworking glue. Epoxy glue is often considered to be the best woodworking glue, as it is very strong and waterproof. It is also very resistant to heat and humidity, and it can be used to make strong bonds that will last for a long time. In conclusion, mixing sawdust and glue is a great way to make a strong and durable woodworking glue. However, you should always make sure to choose a high-quality glue, such as epoxy glue, to ensure that your bond is strong and long-lasting.
Can you use wood glue and sawdust to fill gaps?
To start, you will need to gather a few basic supplies. You will need wood glue, sawdust, a container to mix the two, a stirring tool and a damp cloth. Start by adding a generous amount of wood glue to your container of sawdust. Use the stirring tool to mix the sawdust and glue together until it forms a thick paste. Make sure the mixture is not too runny, as this will not hold in gaps properly.
When the sawdust and glue mixture is ready, you can start filling in any gaps in the wood. Use a damp cloth to wipe away any excess glue from the surface. Allow the mixture to dry before adding a layer of paint or stain. Mixing sawdust and wood glue is a simple solution for filling gaps in wood projects. The mixture should be thick enough to hold the gap tight, but not so thick that you cannot spread it. Be sure to allow the mixture to dry completely before doing any further work.
What is best to fill wood gaps?
It helps to make a strong and durable product with a smooth finish. To fill wood gaps, a combination of sawdust and glue is often used. Sawdust is a great material for filling gaps because it is lightweight and can be found for free. Glue is also a great choice for woodworking projects because it is strong and easy to use. To mix sawdust and glue, start by adding the sawdust to a bowl.
Then, pour enough glue into the bowl to create a paste-like consistency. Use a spoon to mix the sawdust and glue together until they are blended. If the mixture is too dry, add a bit more glue. If it is too wet, add more sawdust. Once the sawdust and glue are mixed together, the paste can be applied to the wood gaps. Use a putty knife or similar tool to apply the paste to the gap and then smooth it out. Leave the paste to dry before sanding down the surface. By combining sawdust and glue, you can easily and effectively fill wood gaps and make your woodworking project strong and durable. This mixture is a great option for those looking for an inexpensive way to fill wood gaps.
What glue mixes with sawdust?
Mixing sawdust and glue can be an effective way to create a strong bond. To make the mixture, start by gathering sawdust and glue. Make sure the sawdust is clean and free of debris. Next, begin pouring the glue into a bucket or container. Slowly add sawdust while stirring the mixture with a spoon or stick.
Keep adding sawdust until the mixture reaches the desired consistency. When you’re finished mixing the sawdust and glue, allow it to sit for several minutes. This will help the glue to fully mix with the sawdust, resulting in a stronger bond. Finally, use the sawdust and glue mixture to attach two pieces of wood together. You can apply the mixture using a brush or a putty knife. Allow the glue to dry and set before using the wood. By mixing sawdust and glue together, you can create an effective bonding agent. With the right materials and technique, you can produce a strong bond that will last for a long time.
How to mix sawdust and wood glue
To begin, you’ll need sawdust and wood glue. You can get sawdust from a sawmill or a hardware store, and you’ll need to buy wood glue from a hardware store. Start by adding a small amount of sawdust to a bowl or container. Slowly add wood glue to the sawdust, stirring to combine the two. Keep adding wood glue until the mixture becomes thick and pasty.
You’ll know it’s ready when the sawdust is completely saturated with the glue. Once you have your sawdust and glue mixture, you can use it to fill cracks and gaps in woodworking projects. Spread the mixture over the area you want to fill, and then use a putty knife or other tool to smooth it out. Allow the mixture to dry completely before sanding it down for a smooth finish. Mixing sawdust and wood glue is an easy way to make an effective woodworking adhesive. The glue and sawdust combination will create a strong bond between two pieces of wood, and it’s easy to apply and sand down for a smooth finish. With a few simple ingredients and a bit of elbow grease, you can create a strong and lasting bond between two pieces of wood.
What is the best glue to mix with sawdust?
Mixing sawdust and glue can be a great way to add strength and durability to certain projects. The best type of glue to use when combining sawdust and glue is a wood glue. Wood glue is specifically designed to bond wood surfaces and penetrate deep into the wood fibers for maximum adhesion. To create a sawdust and glue mixture, start by combining equal parts of sawdust and wood glue in a shallow dish or container. Use a stir stick or spoon to mix the sawdust and glue together until the consistency of the mixture is even and all of the sawdust has been coated with glue.
Make sure to scrape the sides and bottom of the dish as you mix to ensure a thorough adhesive bond. Once the sawdust and glue mixture is complete it can be applied directly to the wood surfaces you would like to bond. Use a trowel, putty knife, or small brush to spread the mixture over the surfaces. Make sure to press the sawdust into the glue and work it into any nooks and crannies for a secure bond. Allow the glue and sawdust mixture to dry completely before putting the project to use. In conclusion, using wood glue is the best glue to mix with sawdust when creating an adhesive mixture. Be sure to mix the sawdust and glue together thoroughly and apply it to the wood surface with a trowel, putty knife, or small brush. Allow the glue and sawdust mixture to dry before putting the project to use to ensure a strong, durable bond.
Can I make wood filler from sawdust?
All you need to do is combine equal parts of sawdust and glue together. For best results, the sawdust should be collected from the same type of wood that you are using to fill the gap. This ensures that the color of the wood filler will be uniform. When mixing sawdust and glue together, you can use a paint stirrer or a piece of scrap wood to mix the two ingredients together into a paste-like consistency. Be sure to mix the sawdust and glue thoroughly so that there are no clumps of sawdust left in the mixture.
Once the sawdust and glue have been mixed together, you can apply the mixture to the gap that you are trying to fill. Use a putty knife or small brush to spread the mixture into the gap, making sure to completely fill it. Allow the mixture to dry completely before sanding it down and finishing off the surface. By using sawdust and glue, you can make a wood filler that is just as good as store-bought wood filler, but at a fraction of the cost. Not to mention, this homemade wood filler is eco-friendly, since you can reuse the sawdust instead of throwing it away. So next time you need to repair a gap in wood, consider using sawdust and glue to make your own wood filler.
Is wood glue and sawdust Stainable?
Mixing sawdust and glue can be a great way to create a beautiful and unique finish on furniture, walls, and other surfaces. Wood glue and sawdust can be used together as a stainable solution, allowing you to create a unique look in any room. To mix sawdust and glue, simply mix equal parts of each in a container. Start with a small amount of sawdust, as too much can make the mixture difficult to work with. Make sure to mix thoroughly until the sawdust is completely saturated with the wood glue.
Once the sawdust and glue are mixed, you can use a brush to apply the mixture to the surface. You can also use a cloth rag to rub the mixture onto the surface for a distressed look. When you are finished staining with sawdust and glue, be sure to seal the surface with a top coat sealer. Make sure the sealer is suitable for the surface you are working on, as some sealers are not suitable for wood surfaces. This unique combination of sawdust and glue is an easy, inexpensive way to create a unique look and finish to any piece of furniture or wall surface. With a few simple steps, you can create a beautiful and unique look with sawdust and glue.
How do you wash wood to make it look GREY?
To do this, you will need to mix sawdust and glue. Start by adding a small amount of sawdust to a bowl of glue. Then mix the glue and sawdust together until they form a thick paste. Once the mixture has been prepared, you can apply it to the wood. Make sure you apply the mixture evenly and let it dry before wiping it off with a damp cloth.
After wiping off the paste, you should be able to see a nice gray finish on the wood. Finally, you can finish the look off by sealing the wood with a clear sealer. This will help protect the finish and make it last longer.
How to make wood filler with sawdust?
Start by gathering sawdust from any source, such as a woodworking shop, hobby shop, or even your own saw. The sawdust should be fine and have a uniform consistency. Next, mix the sawdust with a good quality wood glue. Make sure the glue is completely blended with the sawdust before continuing. You can use a paint stirrer or any similar tool to mix the sawdust and glue together.
Once the sawdust and glue are blended, the mixture should be damp but not too wet. Then, shape the wood filler into a shape that will fill the void you want to repair. You can use a spoon or your fingers to form the filler into the desired shape. When the filler is in the proper shape, use a putty knife or painter’s trowel to press the filler into the void. Allow the filler to dry, and then sand it down for a smooth finish. You can also add a bit of paint or stain to the filler to make it match the surrounding wood. With a little bit of work, you can easily make a high-quality wood filler using sawdust and glue.
What is the strongest type of wood glue?
Wood glue is formulated to form a secure bond between two surfaces made of wood. Mixing sawdust and wood glue is a relatively simple process. First, mix sawdust and water to create a paste-like substance. This can be done in a bowl or with a mixer. Then slowly add wood glue to the mixture and mix until you have a thick, uniform paste.
Once the paste is ready, you can use it to glue two surfaces together. Make sure to apply the paste to both surfaces and firmly press them together. Leave the two surfaces to set for at least an hour before attempting to move them. For maximum strength, it is recommended that you leave the two surfaces to set for at least 24 hours before attempting to move them. This will create an incredibly strong bond between the two pieces of wood. Wood glue is ideal for projects such as furniture, cabinets, and other wood items that require a strong, durable bond. With the right preparation and application, wood glue is one of the strongest types of glue for mixing sawdust and glue.
What type of wood glue should I use?
When mixing sawdust and glue, it’s important to choose the right type of glue. For best results, you should use an adhesive specifically designed for wood. This type of glue is designed to bond wood fibers together and provide a strong, permanent bond. Wood glue is typically a type of white or yellow-colored adhesive that can be used on a variety of materials, including wood, particleboard, plywood, and hardwood. It is most often available in liquid form, but some varieties come in powdered or dried form.
When choosing wood glue, it’s important to consider the application. If the glue will be used outdoors, you should choose a waterproof, weather-resistant variety. For indoor projects, consider a glue that is flexible and has a fast drying time. No matter what type of wood glue you choose, it’s important to pay attention to the instructions on the packaging. This will ensure that you mix and apply the glue correctly. By following the instructions and taking the time to research the right type of glue, you can ensure a strong bond and create a successful project.